Friday, August 13, 2010

Restoring Log Cabin Quilt for The Clearing


This summer I spent another marvelous week of quilting at the Folk school in Door County. On the property there is a small Cliffhouse, a small hide out embedded in the cliffs and tree roots, overlooking the beautiful lake. Inside there is some rustic made furniture and a bed. Guests are allowed to spend a night there, there are no facilities except a fireplace (and I'm told you need to keep the fire going if not the bats will pay you a visit!).

During our stay no one did sleep there and Mike, the manager, joked that it was because there's no quilt to entice the people. All the cabins have lovely quilts on the bed. So I thought it might be a nice idea to make one as a token of appreciation of the wonderful times I've spend at the Clearing.

A log cabin seemed the logical pattern to choose and I suddenly remembered that I had purchased a vintage top through the internet years ago. When it arrived it was badly damaged (rips and holes) and had some big stains and the colors were more drab than the photo showed. I was disappointed but still I couldn't throw it away, someone had put time and effort and maybe love into making it. It daunted on me that it might be the perfect solution to restore the vintage top because it suits the style of the Cliffhouse and the Clearing is all about preservation.

I have no idea of the date, it is an eclectic match of of colors and fabrics (flowers, paisley, dots, plaids, geometrics) that seem to range through a lot of decades. It is machine pieced and the blocks are fairly big (15") and have the traditional red center symbolizing the fireplace.


What is remarkable is that the individuel logs are very often pieced together from several pieces which indicates the maker was very frugal and probably had to use every little piece she had.

From a distance on the wall you clearly see the half dark and half light sides which create the diagonal stripes (this setting is called furrows). When it's on the bed it's less visible because some blocks play with darker values in the light part and vice versa. Though it's very scrappy it has a thought out balance of the colors throughout the quilt. I love a little zing in a quilt and the 3 hot pink logs in the third row from the bottom definitely deliver. Can you tell I love to pour over a vintage top :-)


I have to replace/repair 5 center squares and have to make sure the red doesn't bleed (I can't wash the top til it is repaired). There are about 8 logs I have to replace, I've ransacked my stash and came up with close look-a-likes. Some will need tea dying because the white in the B&W fabrics is too bright. I'm thinking of tying the quilt with red yarn instead of quilting it, it seems more appropriate.


Monday, May 01, 2006

Reveal April Journal: "Clarice Cliff Revisited"


Clarice Ciff Revisited


My inspiration:

I like to watch Flog it on BBC with my DH and off course guessing at what price the items will be flogged (DH is very good at this). Every once in while there will be some handpainted pottery by Clarice Cliff, an artist from the Art Deco period. I always like the bold, bright colors she uses and the big patterns. This time there was a pair of mugs and what attracted my attention was this unusual color combination of a big orange/pink sun. Well, we assumed the two mugs would fetch a couple of hundreds pounds, but the price kept going til 1.400 pounds! I guess they won't end up in a kitchen LOL. I thought I would use the image for a journal quilt to try two new techniques; freezer paper applique and doing an 'overal quilting design' using the backing fabric as a pattern.

The proces: (experienced quilters better skip this in order not to be bored to death LOL)
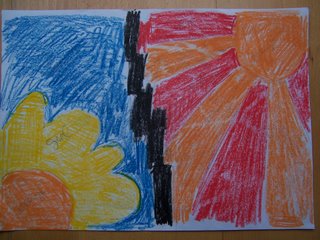
I first made the drawing like I remembered the mug, keeping the shapes very simple. I taped the drawing against the window with the freezer paper on top to trace the pattern.

I cut out the parts and ironed the parts I needed (sun and flower) to the fabric. I cut them out with a seam allowance and used glue to fold it around the shape.
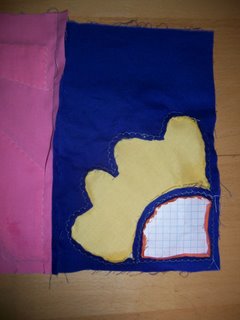
I sewed them down with invisible thread, using the blind hem stitch. The applique foot I purchased for my Pfaff was a real help. I still wonder if there exist such a thing as invisible machine applique but I'm getting closer.

It always seemed a lot of work to me to cut away the fabric from the back in order to remove the paper, but by making damp the fabric and paper it releases more easy than I expected.

I love machine quilting that goes 'all over the place' without any regard to the pattern of the quilt but haven't done much more than meandering or loops etc.
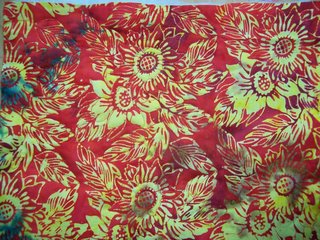
In "Color Fusion" a great book by Laura Heine she explains how she uses the backing fabric as a quilt pattern, putting the top thread in the bobbin. Of course not every fabric is usable, it should have an outline design, not to small and preferable not overlapping. I went three times through my stash to come up with one that seemed do-able (once I get an idea I won't give up LOL).

Backing fabric

I had a hard time when I started because it can be confusing which line to follow but as I went along I loosened up a bit and eyeballed more the shape I should sew. I didn't like it in the beginning, but decided to go on and the end result of the quilting is okay.
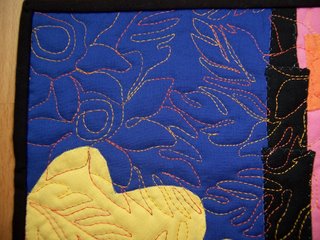
I guess this pattern is also possible to do free hand (doodling like Ricky Timms) but with the right backing fabric it saves a lot of marking.

Detail quilting:

I used Sulky cotton 30

I was surfing on the excellent website of the fanclub of Clarice Cliff www.claricecliff.com when I found the following pattern in the index: http://www.claricecliff.com/cgi-bin/patterns2.cgi?pattern=sunray I wondered if this it what I originally saw on tv or a variation (you might understand why I didn't start the reveal with this image LOL).

Monday, February 20, 2006

February reveal: "Sashiko sample"


Sashiko Quilt Journal

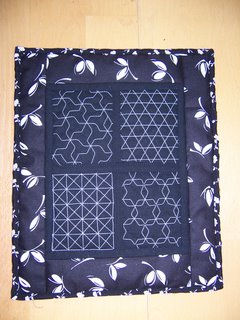
This picture doesn't do it justice because of the flash. It is deep black and there isn't any difference in black between the border and the center, therefore the white seems to 'float'.


For my February journal quilt I decided to explore Sashiko, the traditional Japanese style of decorative quilting. I bought a book called Sashiko some months ago and I was pleasantly surprised when I discovered that the book was about machine quilting and not the traditional hand quilting, since hand quilting gives me neck and shoulder pain. Now, I understand completely that the seize of the journal quilt defeats a bit the style and purpose of sashiko quilting which consists of larger stitches, thicker thread and large patterns but decided to go ahead anyway.

The nice thing of the patterns given in the book is that she breaks down the pattern in continious lines going horizontal, vertical or diagonal and they are marked by different colors. By sewing the lines, gradually the pattern will appear. I decided to go for straight lines so I could use my walking foot, because curves with free motion would be to difficult in this small dimension.

I have a lot of books about techniques but seldom have the patience to read through the instructions and in general come up with my 'own' technique (read: short cuts LOL).
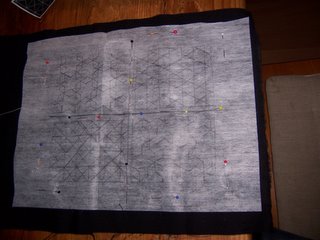
Her way is to make copies and draw over them with transfer pencils. After that you iron it on a tear away stabilazor. Since that seemed too much work for me I decided to trace the pattern on a thin foundation (dyper inlay) and pin that on the wrong side of the fabric. Next time I would use a coloured pen to see better the lines while sewing.


I put the thicker white machine thread in the bobbin so it would show on top. And I put black on top and put the tension in a way that it would show on top too and create the effect of an 'interupted' hand stitch.

I don't like to finish off (don't know the english word) a thread often so I let space between the different patterns to go out en re-enter the frame in a continious way. After I added the batting and backing I covered this space with black strips. In reality you see barely these strips, in the picture they're more visible.


I intended to border it with lace, but that was to overpowering in this small seize so I used a black fabric with large flower prints and a binding with smaller flower prints. Like I said the black is much deeper than in the picture.

I'm happy with my journal piece. It really opened my eyes that you can do many intricate and interesting quilting patterns with a walking foot and continious straight lines. I will try the curved ones in the near future.

Wednesday, January 25, 2006

January reveal "Three Frogs"


This will be the first time I'm uploading pictures, so I hope everything goes well. Allthough I admire some very personal aproaches in the journal quilts, I've choosen improving and exploring techniques as main goal, rather than expressing myself. To have something that will bind this monthly challenges together I've decided to focus on 'stitches' as theme.

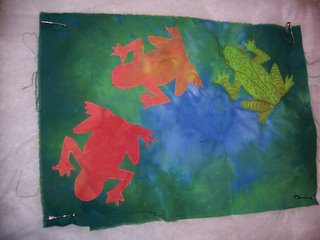
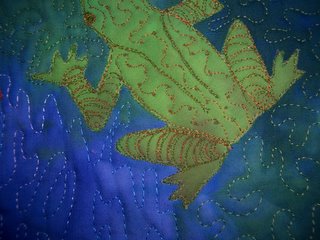
For this month I decided to explore a bit more applique and intensive quilting. In my December Artimage Challenge I had a hard time with the raw edge applique of some frogs with satin stitch. I was relieved when it was done and decided to leave it alone so it wouldn't get spoiled. Since I had some spare frogs I decided to try another approach. This time I sewed the frogs on without the batting and backing which was slightly
easier. I didn't use fusible web (Steam a seam?) but basting spray which was a nice short cut but made the fabric fray more. I used invisible thread, that wasn't as invisible as I hoped, and I zigzagged instead of the satin stitch. It was better but I was still not that happy with the result (if this gets boring please skip, just would to like to write it down somewhere so I won't make the same mistakes over and over LOL).


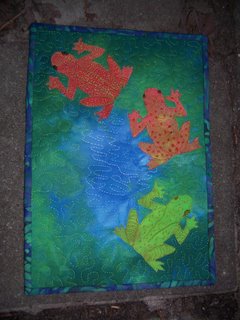
In my challenge the frogs were just silhouettes, now I wanted to give them more detail by quilting/thread painting. I have very little experiences with differeent threads and there aren't many availbale where I live. I used Madeira Embroidery Thread which I alsways use for quilting. I didn't have a plan, but just started to free motion quilt (that might explain a bit why they have this Olily-look). I discovered that it really doesn't matter how neat or close to the edge you sew, it's like sketches with multiple lines, so that was a freeing experience for me. It wasn't exactly what I had in mind, but I'm happy for a start.


The quilting in the background I kept simple by meandering and imitating ripples in the blue to give the impression of water. The fabrics are hand dyed by me.

Monday, January 16, 2006

finally getting there (I hope)

The one thing that prevents me from diving whole heartedly in this journal adventure is setting up this blog. I know it can be done but I'm struggling... I finally succeeded to upload a picture on my profile, will spare you the details, but I'm having a hard time seeing what I have done really apear in the blog. I was a bit aprehensive about the journal part because I thought it would take up to much time to read all those blogs and I don't really want to spend more time on the computer (that way I'll never finish my UFO's LOL). But I like the way you all are putting links in the thread that refer to reveals and work in process. I really like the way some have broke down their working process in steps with clear pictures. I've also had very quick responses to questions I had about techniques. So again a great group from which I can learn so much. So I have to kick myself into gear and try to link up with the rest of you. I'll try to catch up with the january reveal. (This month I had a great distraction, my mom's 80th birthday that we celebrated big with her twin brother and family). I will try some thread painting as well to add detail to applique images. I've done a frog wall hanging in the december artimage challenge. I just did applique the frogs down with a satin stitch (well sort of LOL) but often I'm a bit afraid to do extra stuff for fear it might spoil things. So i have a couple of left over frogs and since I'm a frugal Dutch I'll use them up in this one and stitch away without fear.

Sunday, January 01, 2006

Trying to setup a blog

Not sure what I'm doing, but we'll see.